Table of Contents
ToggleThe Battle Ram has carved out a solid position in the Clash Royale meta for years, and with good reason. This Legendary card packs raw power, spawns Mini P.E.K.K.As on destruction, and forces opponents to make tough defensive choices in seconds. Whether you’re climbing ladder or grinding ladder tournaments, understanding how to deploy, support, and position the Battle Ram separates wins from losses. This guide covers everything from basic mechanics to advanced synergies, counter-play, and placement tactics that’ll elevate your game. Let’s break down what makes this card tick and how to make it absolutely devastating.
Key Takeaways
- The Battle Ram’s dual-spawn mechanic—splitting into two Mini P.E.K.K.As upon destruction—makes it a versatile win condition that punishes single-target counters and rewards strategic support.
- Master counter-push timing and placement tactics by deploying the Battle Ram when opponents are low on elixir or when shifting pressure between lanes forces defensive splits they can’t afford.
- Hard counters like Skeleton Army, Inferno Dragon, and Inferno Tower stop the Battle Ram effectively, but only if you don’t use single-target units that allow spawns to overwhelm your defense.
- Control, beatdown, and bridge spam decks all leverage the Battle Ram through different synergies—cheap cycling, tank support, or relentless pressure—so adapt your archetype to your playstyle and opponent composition.
- Avoid common mistakes like playing Battle Ram too early before testing counters, ignoring spawned Mini P.E.K.K.As as threats, or overcommitting elixir when a smaller Ram push with one support card provides better value.
- Successful Battle Ram plays depend on unpredictable placement, spell rotation tracking, and misdirection—soften opponent defenses with cheaper units first, force out their answers, then unleash your Ram when they’re vulnerable.
What Is The Battle Ram And Why It Matters
Card Stats And Basic Mechanics
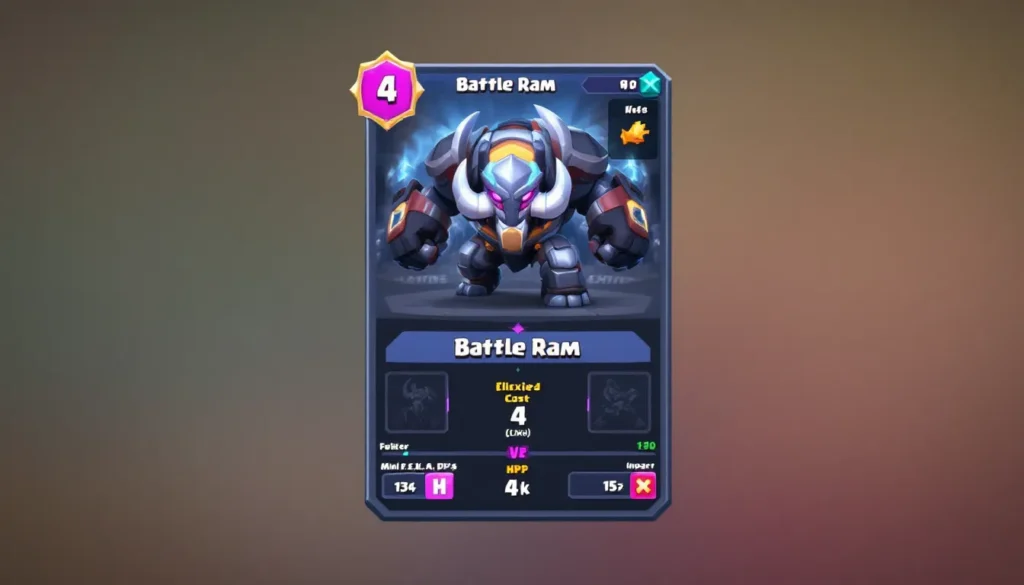
The Battle Ram is a 4-elixir Legendary unit with 1,100 HP (at tournament standard, Level 11) and a solid 177 DPS. It charges toward enemy towers with a melee attack, and here’s the kicker, when the Ram is destroyed, it splits into two Mini P.E.K.K.As (525 HP each), each dealing 140 DPS. This dual-unit mechanic is why the Battle Ram forces so much pressure: killing it outright often feels like feeding your opponent extra troops.
The charge mechanic gives the Ram momentum. Once it locks onto a target, it accelerates, covering ground quickly and hitting hard. This makes it terrifying on the bridge but also predictable if you’re not careful with placement. The spawn mechanic is what separates this card from basic tanks, it rewards aggression and punishes greedy, single-target counters.
The Spawn Mechanic Explained
When the Battle Ram dies, two Mini P.E.K.K.As emerge. Each one inherits half the remaining health pool (if any) and continues attacking. This isn’t just flavor, it’s fundamental to how you build decks and defend against the card.
Let’s say your opponent sends a Battle Ram down the lane with 800 HP remaining. A single Skeleton Army wipes the Ram but struggles against the spawns. A Cannon takes ages to handle both. This is why Battle Ram decks thrive with smart support: the spawns catch defenders off-guard.
The spawned Mini P.E.K.K.As deal roughly 70% of the Ram’s original DPS together, making them a serious threat to low-health defenders. They also inherit any buffs applied to the parent unit (like Rage or healing from a Healer). Building synergies around this mechanic is how you turn a solid card into a win condition.
Best Deck Archetypes For Battle Ram
Midladder Control Decks
Control decks using the Battle Ram focus on cycling cheap defenses, building up elixir advantage, and unleashing a Ram push when your opponent is low on cards. These decks typically include 2-3 elixir troops like Skeletons, Fire Spirits, or Archers, paired with 3-4 elixir buildings or spells.
Example Control Archetype:
- Battle Ram
- Cannon
- Fireball
- Zap
- Skeletons
- Ice Wizard
- Dart Goblin
- Log
This setup cycles quickly, defends efficiently, and lets you out-elixir your opponent before the Ram lands. The Ram becomes your finisher when your opponent has already spent resources defending smaller pushes. When checking out Clash Royale Top Decks, you’ll see dozens of control variations, the core idea stays the same: cheap cycles into a Ram win condition.
Beatdown And Support Strategies
Beatdown decks throw multiple win conditions forward with heavy support. The Battle Ram pairs beautifully with tanks like Giant, Golem, or P.E.K.K.A because those units draw fire while the Ram deals splash damage or punishes distracted defenses.
Beatdown Example:
- Battle Ram
- Giant
- Musketeer
- Fireball
- Inferno Dragon
- Tornado
- Archers
- Log
In this deck, you defend until you stack a Giant + Battle Ram combo. The Giant soaks damage while the Ram’s spawns clean up. Tornado pulls enemies into your Musketeer or Inferno Dragon. Beatdown games are won on one massive push: the Ram’s dual-unit spawn makes that push nearly impossible to stop if your opponent lacks reset mechanics.
Bridge Spam And Cycle Variations
Bridge spam throws Battle Ram at the bridge repeatedly, cycling back to it before you’d normally expect it again. Decks include Bandit, Royal Ghost, and other bridge-friendly units. The idea: constant pressure, fast cycles, and chip damage until a big Ram push breaks through.
Bridge Spam Example:
- Battle Ram
- Bandit
- Royal Ghost
- Goblin Gang
- Inferno Dragon
- Tornado
- Zap
- Log
These decks are aggressive and require confident play. You’re banking on overwhelming your opponent before they set up a solid defense. The Battle Ram’s spawn mechanic synergizes perfectly here: even if they stop your Ram, the Mini P.E.K.K.As keep the pressure alive. Looking at Clash Royale Top Decks: Unlock Winning Strategies, you’ll notice bridge spam variants shift in and out of the meta depending on what’s defending the arena.
Optimal Placement And Timing Strategies
Counter-Push Placement Tactics
Counter-pushing with the Battle Ram is timing a Ram placement in one lane while your opponent’s units occupy the opposite lane. This punishes over-committing and capitalizes on elixir imbalance.
Here’s the strategy: Your opponent sends a Knight + Firecracker down your right lane. You defend with a Cannon + Zap, spending 5 elixir total while they spent 7. Now they’re lower on elixir. You drop a Battle Ram in the left lane with 3 elixir remaining. They can’t defend efficiently because they’re low on resources and weren’t positioned to stop a left-lane threat. Even if they manage to stop the Ram, you gained a 2-elixir trade and reset their attack.
The key: Don’t counter-push reactively every time. Your opponent learns patterns. Mix in times when you defend AND cycle a Ram into hand for a later coordinated push. Timing is everything, drop the Ram when your opponent just spent heavily or when they’re cycling back up.
Mirror Lane Pressure Techniques
Mirror lane pressure means sending Battle Ram into the same lane your opponent is attacking. This creates a 1v1 race: whose unit reaches the tower first and does more damage?
The Ram wins most races against ground troops because of its high health and DPS, especially with spawns. If your opponent sends Royal Hog, your Ram destroys it and the spawned Mini P.E.K.K.As continue to the tower. Against air threats like Balloon, a bare Ram loses, you need a tankier front or spell support.
Mirror lane isn’t always optimal. Sometimes defending and counter-pushing gives better value. But when you’re ahead in elixir or your Ram is backed by a cheap card like Skeletons or Ice Wizard, mirroring forces your opponent into a bad position. They either commit more elixir to guarantee the win (overspending) or watch your Ram chip their tower while they trade poorly.
Placement matters here too. Don’t drop your Ram in the center of the lane where every building and spell hits it equally. Drop it slightly to the left or right to draw defenses, or place it far enough from the tower that it charges and picks up speed before incoming damage registers.
How To Counter Battle Ram Effectively
Troop Counters And Interactions
Countering the Battle Ram requires understanding what stops it efficiently. Skeleton Army (3 elixir) is historically the hardest counter, it swarms the Ram, and the spawned Mini P.E.K.K.As can’t one-shot skeletons. This gives your army time to kill them. But, a single Zap or Log wipes the Skeleton Army, so watch your opponent’s spell rotation.
Inferno Dragon (4 elixir) is another strong answer. Its beam ramps up damage and shreds the Ram quickly, and the spawned Mini P.E.K.K.As don’t reset the beam. The Inferno Dragon continues burning them down. This is one reason Tornado is so popular in defensive decks, it pairs perfectly with Inferno Dragon by pulling both the Ram and spawns into the Dragon’s range.
Tesla (4 elixir) is underrated against Battle Ram. Its long range and continuous output don’t require retargeting, and it covers both lanes when placed centrally. The Mini P.E.K.K.As can’t one-shot it, giving it time to deal chip damage.
Giant (5 elixir) acts as a pseudo-counter if you’re using it defensively. Its massive HP soaks the Ram’s charge, and your supporting troops finish it. You’ll likely need two troops, but the trade-off is often favorable.
Here’s a critical point: Never use a single-target unit like Knight or P.E.K.K.A to counter a lone Ram. The Mini P.E.K.K.As spawn, and now you’re facing two units with your one. Use swarm, buildings, or reset mechanics instead.
Spell And Building Defenses
Inferno Tower (5 elixir) hardcounters the Battle Ram far better than most buildings because the beam ramps damage instantly. The spawns don’t reset it. Drop it in the center to cover both lanes, and the Ram dies without dealing significant tower damage.
Tornado (1 elixir) is a defensive utility tool. It doesn’t kill the Ram, but it pulls it away from the tower, buying time for your troops to set up. Paired with Inferno Dragon, it’s a lethal combo. The Ram gets pulled into range, and the Dragon melts it and the spawns.
Fireball (4 elixir) and Rocket (6 elixir) are spells that can counter Battle Ram in specific situations. A Rocket kills the Ram outright, expensive but guarantees a stop. Fireball doesn’t one-shot the Ram, but it works as a follow-up. Use it when the Ram is damaged or when you’re using it in combination with a troop counter.
Earthquake (3 elixir) stuns the Ram for a moment, and the building crush damage helps. It’s not a complete answer, but it buys time for troops to set up. Pairing it with Swarm units turns the stun into a full stop.
The meta right now favors building-based defenses and reset mechanics. If you’re struggling against Bridge Spam or Ram-heavy decks, slotting in Inferno Tower and Tornado gives you reliable answers. Check platforms like Game8 for current meta snapshots, counters shift slightly with balance changes and seasonal shifts.
Advanced Synergies And Win Conditions
Support Card Combinations
The Battle Ram shines when paired with the right support. Rage spell (2 elixir) is a classic synergy, it doubles the Ram’s damage output and attack speed. A Raged Ram + spawns can chew through a tower in seconds. The risk: if your opponent has a reset card or hard counter, you’ve wasted 6 elixir (4 Ram + 2 Rage). Only use Rage when you’re confident your opponent lacks defensive answers.
Healer (3 elixir) keeps the Ram alive longer and heals the spawned Mini P.E.K.K.As as they attack. This extends the push’s lifespan and makes it harder to kill through raw damage. But, Healer is vulnerable to spell damage, so this combo only works if your opponent has limited AOE.
Mother Witch (4 elixir) converts enemy troops into Hogs when she hits them, creating chaos on defense. A Ram + Mother Witch push is unconventional but can punish opponents who rely on specific defenders.
Tornado (1 elixir) pulls enemy troops into your Ram’s range, ensuring they take damage. It also sets up your Ram to hit buildings first instead of spreading troops, maximizing tower damage.
The best synergy is always cheap cycle + Ram + one support card. Zap a Skeleton Army, Rage the Ram, watch it roll. Or cycle a Log to clear swarms, then drop a Fireball on defending troops while the Ram walks to the tower.
Creating Unstoppable Push Sequences
An “unstoppable” push isn’t literally unbeatable, it’s a sequence so threatening that your opponent must respond with their best defensive cards, leaving them vulnerable to follow-ups.
Here’s an example with the Path of Legends meta in mind:
- First Wave: You play a Battle Ram at 7 elixir.
- Your Opponent Responds: They drop Inferno Tower (5 elixir) to counter.
- You Escalate: You immediately Fireball their Inferno Tower (4 elixir), destroying it before the Ram reaches it.
- The Payoff: The Ram is now uncontested, reaches the tower, spawns Mini P.E.K.K.As, and deals massive damage. You’ve created a scenario where the tower is under too much pressure to manage.
This works because you anticipated their most likely response and had an answer prepared. Advanced players cycle cards in hand, predict defensive placements, and time support cards to remove blockers exactly when the Ram arrives.
Another sequence: Beatdown double-push. You build up elixir slowly with a Defensive formation. Then you play Giant in one lane. Your opponent commits to that lane. You immediately follow with Battle Ram in the opposite lane, forcing a split defense they can’t afford. One tower falls.
The key to “unstoppable” pushes is misdirection and timing. Soften your opponent’s defenses with cheaper units first. Build to your Ram. Make them spend their answers. When the Ram hits, they’re out of options.
Common Mistakes And How To Avoid Them
Mistake 1: Playing Battle Ram Too Early
Dropping your Ram at 3 minutes into a match when you haven’t tested your opponent’s counters is a recipe for disaster. If they have Inferno Dragon and Tornado, your Ram dies without dealing damage, and you’ve handed them a 4-elixir advantage. Always cycle cheaper units first to force out defensive answers.
Mistake 2: Ignoring Spawned Mini P.E.K.K.As
Many players focus entirely on stopping the Battle Ram itself and neglect the spawns. The spawns are half your threat. Allocate defensive resources to handle both. A Cannon alone won’t work, pair it with a swarm or spell. Respect the spawns as separate threats.
Mistake 3: Overcommitting Elixir on One Lane
Sending a Battle Ram + Rage + Musketeer + Inferno Dragon is tempting, but it’s a 16-elixir commitment your opponent can defend with a 6-elixir reset (Tornado + Inferno Tower). You’re trading health for elixir negatively. Push smartly, Ram + one good support card is often better than Ram + everything.
Mistake 4: Poor Timing on Counter-Pushes
Countering when your opponent is at full elixir means they can immediately defend your Ram push. Watch your opponent’s elixir bar. Play your Ram when they’re low, transitioning from a defense they just made. This 3-4 second window is where Ram plays succeed.
Mistake 5: Predicting Wrong Defenses
Assume your opponent knows your deck. If you always follow a Battle Ram with Fireball, they’ll bait your Fireball with a weaker unit and then set up their true defense. Mix up your support, sometimes Rage, sometimes Zap, sometimes nothing. Keep them guessing.
Mistake 6: Placing the Ram in Predictable Spots
Always playing Ram at the bridge center? Your opponent places their Inferno Tower center and locks it down instantly. Vary placement, sometimes at the bridge, sometimes as a counter-push far lane, sometimes in a dual-lane setup. Unpredictability wins games.
Mistake 7: Not Accounting for Spell Rotation
If your opponent used Zap two plays ago, they have it back up. Avoid sending Skeleton Army to defend if Zap will wipe it. Similarly, know when their defensive spells are down and commit your hardest push then. Deck Clash Royale: Unlock Victory strategy guides emphasize card tracking, master it, and you’ll crush opponents making these mistakes.
Conclusion
The Battle Ram remains one of Clash Royale’s most versatile win conditions because of its dual-unit spawn mechanic and flexibility across multiple deck archetypes. Whether you’re cycling control, executing beatdown, or hammering bridge spam, the Ram adapts. Master its placement, understand its spawns, recognize soft counters, and learn when to support versus when to cycle.
The meta shifts seasonally, and balance patches occasionally tweak the Ram’s stats or spawns, so staying current through resources like GameRant keeps your knowledge fresh. Build your decks with the Ram as a centerpiece, test relentlessly on ladder, and don’t shy away from mixing playstyles, a player comfortable with control one game and beatdown the next is unpredictable and dangerous.
Practice counter-push timing, spell rotation tracking, and predictive defense placement. These fundamentals separate average Ram players from chip-away ladder grinders and tournament-caliber competitors. Your opponents will stop underestimating the Ram, make sure you don’t either. Now go out there and smash some towers.


